The Stone of the 21st Century CAD Drawings. Download Hatch Patterns (Zip) Download DWG Files (Zip) Download DXF Files (Zip) Latest News. November Newsletter. We are very excited about the progress being made at our 295,000 square foot manufacturing facility! Production lines are set to go into the new plant in February of 2019. Dwg stone hatch pattern. Download this FREE CAD Block of a 12 ' X 12 ' COQUINA STONE HATCH including dimensions. This CAD hatch pattern is ideal for populating your landscape design drawings. (AutoCAD 2000.dwg format) Our CAD drawings are purged to keep the files clean of any unwanted layers.
OneNote for Mac Excel 2016 for Mac Outlook 2016 for Mac PowerPoint 2016 for Mac Word 2016 for Mac Office 2016 for MacLast Updated: May 15, 2018ISSUEUsers may see issues with fonts when using version 16.9 of Microsoft Word, Excel, Outlook, OneNote and Microsoft PowerPoint on macOS.Symptoms:.Text appears garbled or in a different font.Some fonts including Times New Roman are missing or unavailable in the font picker.Some fonts are being substituted with other fonts.You may see a message bar saying 'We were unable to load all your fonts. Some fonts may be missing.' STATUS: WORKAROUNDWe recommend you follow these steps:.Check the installed versions of the font. If you have multiple versions, then make sure the latest version of the font is active.If you have a single version of font, check the font type. If the font type is displayed as “PostScript-Type1”, we recommend you upgrade it to a newer 'OpenType' version of the font.If you have a large number of fonts installed on your system, Microsoft Office apps may not be able to load all the fonts. This causes some fonts not to appear in the font picker.
If you're looking for free fonts, we recommend checking out. Find whatever fonts you like and simply click download. Just pay attention to the copyright license above the download button.If a font says it's 'Free for personal use,' you can't use it for commercial or business use or you risk getting sued by the copyright owner.Once you've downloaded all the fonts you want, open the Downloads folder on your Mac, or wherever your browsers default download location is.
Your fonts should be in compressed.zip files, just double click on one to uncompress it. Some will just contain a single font file, whereas others will contain a folder with multiple font files, a 'read me' and font previews.The simplest way to install a font is to open it, and click Install Font. A faster method is to click 'Go' in the menu bar, hold the option key, and click Library. Now find and open the Fonts folder.
Download and install custom fonts to use with Office. On the Mac you use the Font Book to add the font and then copy it to the Windows Office Compatible folder. Many third parties outside of Microsoft package their fonts in.zip files to reduce file size and to make downloading faster. If you have downloaded a font that is saved in.zip. Mar 18, 2019 Double-click on the font file to install; Manage Mac fonts effectively. With time, your collection of fonts will grow. Naturally, Font Book makes it easy to keep track and manage all your typefaces. When you open the app, all the default typefaces can be found in the Computer tab, and everything you’ve downloaded since in the User tab.
Right click on your Downloads folder in the side bar, and click 'open in new window.' Switch your Finder to Action view, which allows you to have access to everything contained in a folder without having to open it. Now simply double click all the zip files to unzip them, and drag all the files that end with.tff or.otf into the Fonts folder. This will instantly install the fonts, but there's just one issue: installing the fonts with these two methods only installs the fonts for the Mac user account you are currently logged into. There's a couple of ways to install fonts system-wide on your mac.
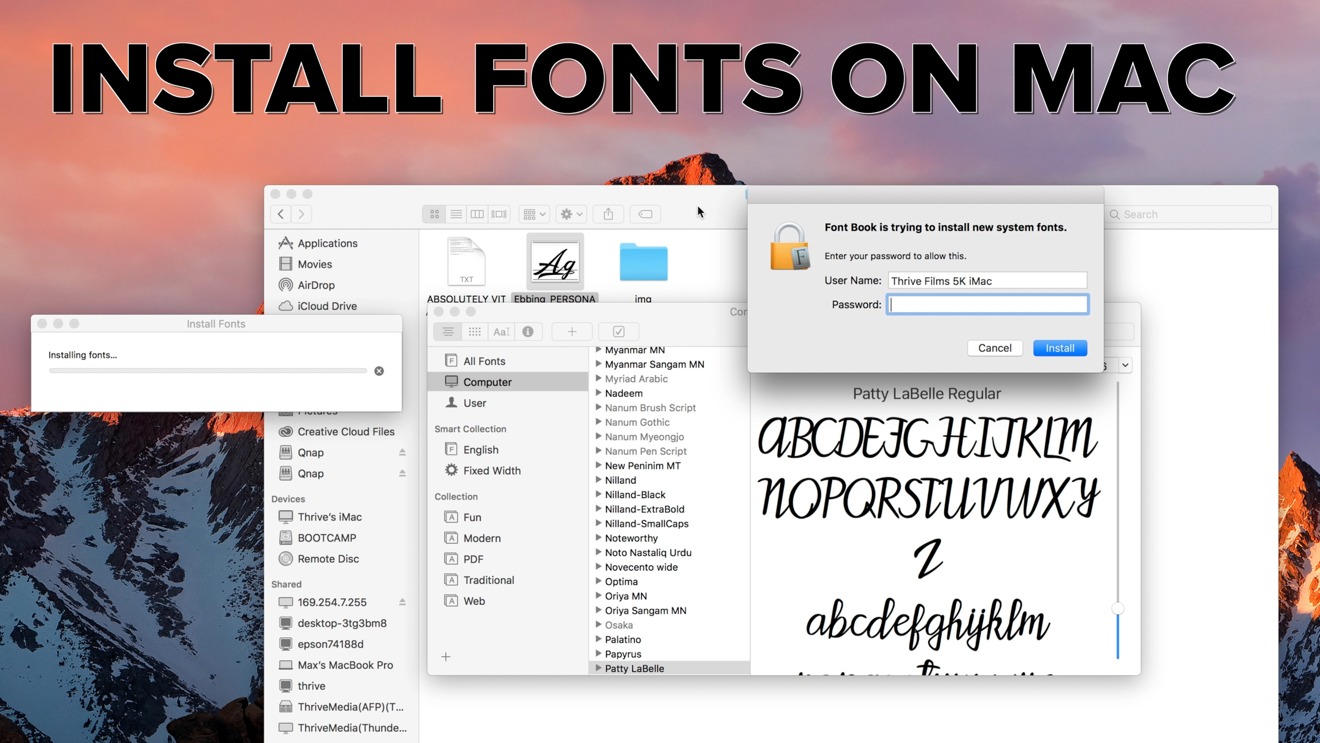
With Finder selected, click 'Go' at the top of the page, and click 'Go to folder.' Type in /Library/Fonts and click Go. This will take you to the systemwide fonts folder instead of the individual user fonts folder. As you can see, it's full of the default fonts that come with your Mac. Perform the same process of dragging and dropping fonts into that folder to install them.If you prefer to have all your fonts installed systemwide, you can set them to automatically install to the whole computer instead of per each user. Just double click on a font in your Downloads folder, then click Font Book in the menu bar, and click Preferences.
Now simply switch the default install location to 'Computer' instead of 'User.' You can also check the box to automatically get rid of duplicate fonts. Now, every time you use Apple's default method of installing fonts, they will install systemwide.The only downside to this method is that you have to constantly enter your passcode, so using the drag-and-drop makes it easiest. If you've just installed some fonts and you can't seem to find them in the application you're using, just restart it, and they should show up.